OpenCV Configuration on Windows10
The configuration is based on Win10(64 bit), CUDA8.0, CMake 64 bit(3.6.3), TBB, OpenCV 3.1 source code, Visual Studio 2015. (Laptop SurfaceBook, 16GB RAM, 500G SSD, i7-6600U, Nvidia GPU(1GB RAM))
I learned OpenCV under the guidance of professor Frédéric Precioso in Polytech Nice-Sophia, Nice, France.
Normally, it is a better chocie to play with OpenCV on some development kit like NVIDIA Jetson TK1. But we can also try it with our pour hardware for fun^-^
Procedure 0 prepare the tools
- OpenCV source code including OpenCV and Opencv_contrib
- Nvidia CUDA 8.0
- CMake 3.6.3 64bit other version may cause errors
- TBB
- Visual Studio 2015 community, install the C++ module to get the cl.exe compiler(you can create a C++ project to verify it is installed). I am using 64bit version, 32bit version should work as well.
After downloading and installing these tools and source codes, we can go to next procedure.
Procedure 1 configure and generate .sln
In this part, we need to configure and generate the VS solution.
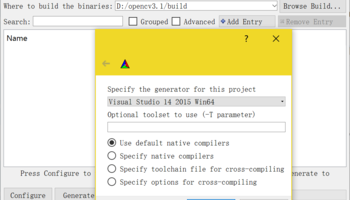
- open CMake, and choose the source directory(OpenCV code) and destination directory(can be any path).
- click configure, a dialog will pop up and we can choose the compiler(vs 2015 64 bit for me)
- the first configure will take some time, and it will give some errors, we need to click several options
- BUILD_EXAMPLES: sample codes
- OENCV_EXTRA_MODULES_PATH: put the path of
opencv_contribsource code here - WITH_CUDA
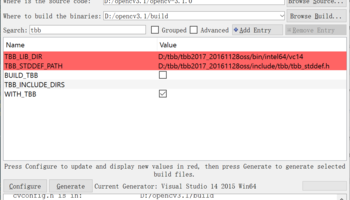
- WITH_TBB: after click this(cmake will report include dirs not found, we need to put the path of tbb there, the finall configuration should be like below)
-
 </picture>
 - after configuration succeessfully(no red highlight or configure bugs), we can generate the solution, you can find OpenCV.sln in destination directory

some hints:
- if cmkae cannot find some head files during configuration, it could be some unix-like head file, you can find replacement solution on Internet, and put them in your local compiler library
- if some modules continue reporting bugs, you can check if it is mandatory for you, if not, you can just unclick it
Procedure 2 build the source code
In this part, we can compile and build the solution.
The solution should like below: (samples includes sample codes, modules includes various libs)

- We can build all the codes together (build the
INSTALLproject underCMakeTargets), normally it takes 1 hour for my laptop, there must be lots of bugs for first build - So we’d better build the codes we want to use one by one, then we will not generate a lot of useless lib and escape from endless bugs
some hints:
- just remove the useless reference and lib if you can not fix it, because some libs are not finished, don’t waste time on it
- since VS2015 does not support VLA(Variable Length Array) which is supported in g++, we can use
malloc()andfree()function to rewrite the codes.
Procesure 3 test
I use the /sample/gpu/surface_keypoint_matcher to do the test, I build it and find the .exe file in ../bin/Debug/ folder, you can also set the parameters in VS to run it.
The result looks like below:

This is a code for matching the surface of objects in two images, you can try with any other images.